- Apr
- 15
Zelda: The Quilt-Along — The Bomb
Posted Wednesday, April 15th, 2015 in QAL | Tags: , quilt along, Zelda

We are now ready to make the FOURTH block of our Zelda: The Quilt-Along. As a reminder, our full list of fabric and tool requirements are located here, which includes yardage for fabric for the entire quilt. For this particular block, you’ll need the following fabrics and supplies:
Fabric & Thread Requirements
| Black Kona: Black |
White Kona: White |
||
| Dark Blue Kona: Deep Blue |
Blue Kona: Lavender |
||
| Interfacing Pellon 911FF |
Thread White Thread |
Tools Needed for this Block
- Pressing Iron (Recommended: Smaller, travel iron)
- June Tailor Shape Cut (Optional) or other tool(s) to cut 1.5″ squares of fabric
- OLFA Rotary Cutter
- Pressing Board & Grid (learn how to make our Pressing Board & Grid here)
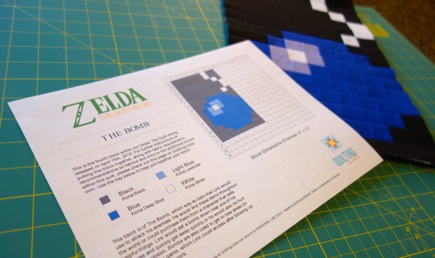
And finally, make sure to download our complimentary pattern for The Bomb:
Our Fourth Block: The Bomb
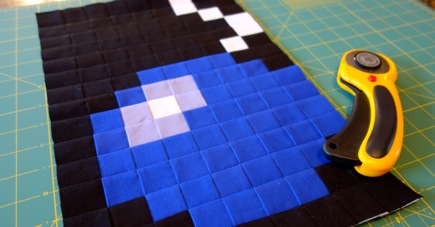
The fourth block that we will be making is The Bomb, which was an item that Link would use to attack his enemies. He would find these items throughout the world or could purchase them from a character that sells helpful things. Link would set a bomb down near one of his enemies and quickly get away quickly or he would also be hurt by the explosion. Bombs are also used to get to new areas on the map of the game, which Link could access after blowing up specific rocks or doors.
The Bomb will be constructed in the same manner as the other blocks, The Candle, The Fairy and The Key, however the size is different. The Bomb block grid is 9 squares across and 15 squares down and it uses the following number of 1.5 inch squares:
| Color | Usage in this Block | Squares Needed | |
| Black Kona: Black |
Background of the block | 77 | |
| Dark Blue Kona: Deep Blue |
The Bomb itself | 45 | |
| White Kona: White |
Highlights on & the string for the Bomb | 7 | |
| Blue Kona: Lavender |
Highlights on the Bomb | 6 |
The Interfacing
The fusible interfacing is cut 13.5″ wide by 22.5 ” long. It will be a rectangle that covers Blocks A1 through O9 on our Grid. Remember to place your interfacing with the fusible side up.
Cutting Our Fabric
Cut your fabric into 1.5″ squares using the totals specified above for The Bomb block. To find an easy guide on how to cut out a large amount of squares at once, follow our instructions using the June Tailor Shape Cut Ruler in The Fairy block post.
Laying Out Our Fabric
To make The Bomb block, you will be placing the correct color fabric square on the fusible side of the interfacing following the pattern for The Bomb, which can be found here. The numbers and letters on your grid will correspond with the numbers and letters on each block’s pattern. You can download the pattern which contains the layout of the individual squares for The Bomb (Block 4) here.
Additional Steps
Further information and photos for these additional steps can be found within our first block’s instructions (located here at The Candle) but we included a quick recap below just for your review.
1. Press the Block: When you have finished laying out the fabric squares on the interfacing, press them with an iron following the interfacing manufacturers instructions. To press, (pressing cloth is optional) carefully place the iron on each section of the block until you have fused all the pieces in place. (Tip: I use a small travel iron for this step.)
2. Sew the Block: Fold and press the block along the seam line ,where the pieces meet, across the width of the fabric. Use a scant 1/4 inch, sew next to the fold lines you just made. Snip the seam allowance through the interfacing where the squares meet, being careful NOT TO GO THROUGH THE SEAM. Press the seam allowances for each row in alternative directions. Finally fold along the vertical rows and sew using a scant 1/4 inch.

Comments

Welcome to Quilting Linda
Within you'll find info about quilting, including my projects soon to be featured below, as well as tidbits about my friends & family. Enjoy!


 © 2009 Linda West