- Mar
- 8
Zelda: The Quilt-Along — Sashing and Borders
Posted Tuesday, March 8th, 2016 in Quilting | Tags: , quilt along, Zelda
If you have used interfacing in all of your blocks, you will need to use interfacing on the sashing and borders. The reason you will do this is because the sashing and borders will stretch more than the blocks and it will be difficult to keep it flat to quilt if it does not have interfacing.
Preparing and Cutting the Sashing and Borders
(Sashing = Strips of fabric that go between and around the blocks)
I cut a length of iron-on interfacing to fit the width (selvage to selvage) of the black and the green (Kiwi) fabrics. Press it onto the wrong side of the sashing and border fabrics.
After the interfacing is attached to the back of the fabric, cut 2 1/2 inch strips as follows for the sashing:
Green (Kiwi) = 7 strips
Black =12 strips
Assembling the Quilt Top
You have now assembled all your blocks and they are ready to be joined into sections using sashing strips between the blocks.
For the first section:
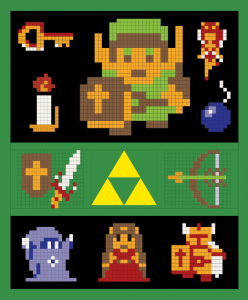
1. Sew the Key block to the top of the Candle block.
2. Sew the Fairy block to the top of the Bomb block.
We will join the two sections to the Link block by adding sashing to each long side of the of the Key/Candle block and the Fairy/Bomb block and sewing to the sides of Link.*
Helpful Hint: *Measure the length of the two sections and the Link block. If there is a large difference between the sections, you may need to add a piece to the shorter section. For example: If the Key/Candle block is 1 inch shorter than the Link block, cut a 1.5 inch strip of interfaced black fabric. (The half inch is the seam allowance.) Measure the width of the Key/Candle block (15.5)and cut the 1.5 inch strip that length – 1.5 X 15.5 inches.
Sashing will be added between the blocks in the middle and bottom sections of the quilt, using the same color fabric as the background in the blocks. Sashing will also be added all around the outside of each of the three sections. To do this, measure the length of each section and cut sashing to that measurement for the ends of the section. (It should be the same length as the sashing you added between the blocks.) Next measure the width of the entire section and sew a piece of sashing to the top and bottom of the section. Make sure each of the three large sections measure the same width.
When you have all three sections assembled, sew the sections together as shown above in the illustration of the quilt.
Adding the Border
(3 1/2 inch strips)
Green (Kiwi) = 8 strips
To make the border, I like to join all the strips end to end to make one long piece. Measure the length of the quilt top and cut 2 pieces that length. Sew one on each side of the quilt top. Next, measure the width of the quilt and cut 2 pieces that measurement. Sew to the top and bottom edge of the quilt.
Helpful Hint: If one piece is slightly larger than the other piece, place the larger piece on the bottom next to the feed dogs on the machine when you sew. This helps to ease the slightly different sized pieces together.
Congratulations! You have now finished the quilt top!
Quilt as desired.
I quilted my Zelda quilt on my short-arm quilting frame. Because of the thickness of the quilt top with all the seams and interfacing, I used a large needle in my machine and did a large meander design.
Binding
This is the only part of the quilt that will NOT have interfacing. I like to cut 2.5 inch strips and join them together with a diagonal seam. Use your favorite method of binding to finish your Zelda quilt.
Comments
- Josie says... April 18, 2017 | 2:59 pm
Once again I would like to thank you for this amazing pattern and all the work you put in to it and then sharing it for free! My son and i just finished making this quilt top and we love the way it turned out! Here is the link to my blog again so you can see our completed top!
http://sewitsnothingextraordinary.blogspot.com/2017/04/legend-of-zelda-finished-quilt-top.html

Welcome to Quilting Linda
Within you'll find info about quilting, including my projects soon to be featured below, as well as tidbits about my friends & family. Enjoy!


 © 2009 Linda West