
- Jul
- 14
3 years later….Confetti Log Cabin
Posted Saturday, July 14th, 2012 in My Projects, Quilting | Read More
In February 2009, I took a class taught by Carol Vinnedge, a member of Appleseed Quilters Guild. I made three blocks during the class. I posted pictures of the blocks in one of my first posts on this blog. The blocks and fabrics for the quilt were put away as I worked on another quilt all the while thinking about this quilt. As you can see from the blog, lots of quilts have been started and finished since that date in February 2009.

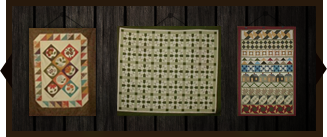
One of my goals for 2012 is to finish some of the UFOs in my stash. In June I made 3 of the mini quilt kits that I bought years ago. The Confetti quilt was still nagging at me to be finished. Two weeks ago I got it out again and started working on the blocks. I like to chain piece and this is not a block that can be chain pieced easily. I did work out a method for piecing. I made lots of strips with the bright colors inserted into the white and black fabrics.

Next I cut the strips to the correct length and arranged them on a flannel board in the order they were to be sewn. I have three boards therefore I prepared three blocks at a time.

Rather than using the iron to press each seam (outside temperatures over 100 F), I finger pressed the strips and waited until three blocks were finished to press them. And finally…the last block was made today!
There are 35 blocks ( 7.5 inches finished size) in seven rows of five blocks across. There will be borders added to make a small quilt approximately 45″ X 59″.


- Aug
- 5
Appleseed Quilters Guild Monthly Mini
Posted Friday, August 5th, 2011 in Wall Hanging | Read More
Appleseed Quilters Guild in Fort Wayne, IN holds a drawing for a small quilt each month. It is usually a small wall hanging but it can be a purse or other small quilted item. The quilt for August was a small hand quilted and embroidered wall hanging.
I purchased one ticket and was the lucky winner. Mary Cummings donated this adorable wall hanging. Thank you Mary!


- Jan
- 30
Quilt Guild Garage Sale
Posted Sunday, January 30th, 2011 in baby quilt, Fabric Stash, Fabrics, Quilt Guilds, Quilting | Read More
At the Appleseed Guild meeting in January, the program was a garage sale. About ten people rented tables and sold unwanted quilting supplies. There was a nice variety of items available for purchase. My “find” was this lunch box filled with ‘Funky Monkey’ fabrics. I measured it when I got home and found I have over five yards of fabric. One piece has one square cut out but all the other pieces are uncut. I plan to make a quilt and maybe include a sock monkey in the lunch box for a baby gift.

- Sep
- 16
Double Wedding Ring Quilt-finished!
Posted Thursday, September 16th, 2010 in Quilting | Read More
I started this quilt after Jen and Trist’s wedding in September 2008. I worked on it through the winter and finished piecing the top in the spring of 2009. I was undecided on how to quilt it. Carol offered to let me use her HQ 16 to quilt it, but I was intimidated by the large areas that needed a special design.
I saw the work done by Kat Waterson, a long-arm quilter, at an Appleseed Quilters Guild meeting. Her work is beautiful so I talked to her about scheduling a time to quilt the DWR. Since this was a custom job, she had to have a full week open to put it in her schedule. The earliest date available was the end of July 2010. I took it to her a few days before the scheduled time and selected the pattern and thread color. It took her about 4 days to quilt it.
I had to trim the edges and put the binding on. I took it to the church to lay it out on the large tables, and trimmed the edges. The binding had to be cut on the bias because of the scalloped edges. The next step was to sew the binding to the front of the quilt by machine and then stitch it to the back by hand. The hand stitching took me approximately eight hours.


I made a label to sew on the back and a set of pillowcases from the extra fabric.

They will receive the quilt and pillowcases for their second anniversary on September 27, 2010.
- Aug
- 15
Edyta Sitar Quilt Class
Posted Sunday, August 15th, 2010 in Fabrics, My Projects, Patterns, Quilt Guilds, Quilt Shows, Quilting | Read More
Edyta Sitar was the featured artist at the Appleseed Quilt Show at the Coliseum in Fort Wayne, Indiana last week. She taught a workshop called Hannah’s Sugar Baskets which I attended. The cost of the class included a kit of fabric. She gave us enough fabric to make the 12 baskets plus extra, triangle paper for 700 HSTs, recipe cards with the patterns, a folder with quilt layout sheets, and her 2011 calendar that includes 3 patterns. The fabric for the class was cut into strips and ready to make half square triangles using the triangle paper.
She had each of us (21 students) sew five sheets of HST (half square triangles), cut them apart and share with the class. We kept 7 HSTs from each sheet and put the rest into 21 piles. When everyone was finished sewing and cutting, we each received one of the piles of HSTs. This created a very nice variety of fabrics and colors that all coordinated.
After lunch we removed the paper from the HSTs and trimmed the ‘dog ears’ from the squares. She then demonstrated how the basket blocks were assembled, giving us hints on color placement. She also gave us tips on choosing fabric patterns. She told us to choose five prints,small, medium, and large size, dots, and stripes. We then assembled blocks until the end of the class.
During the class, Edyta displayed many of her finished quilts, showing them as she taught the class.
I attended this class with two of my very good friends, Cheryl and Kris. During the two hour lunch break, we visited the vendors and viewed some of the quilts displayed in the quilt show.
I returned to the Coliseum the next day to meet another good quilting friend,Sharon. I met her on an online quilting forum a few years ago.
Below are the baskets I made with the HSTs from the class.

- Jun
- 13
My new design wall
Posted Sunday, June 13th, 2010 in Quilt Guilds, Sewing and Crafting, Tips and Tricks | Read More

I made this portable design wall from instructions given at the Appleseed Quilters Guild meeting in April. Items needed are a dressmaker’s cardboard cutting board, two metal curtain rods (72″ white rods that curve at the ends), a piece of flannel or felt 44″ X 80″, 10 large binder clips, and painter’s tape or double sided carpet tape. To make a smaller design wall, a tri-fold display board can be used.
I made mine from items that I had on hand except for the cutting board and curtain rods. I owned a dressmaker’s cutting board but it disappeared long ago. My friend Liz gave me her old cutting board. I purchased the curtain rods at Dollar General for $3.50 each. I had a box of large binder clips, painter’s tape, and a nice piece of white flannel.
Cover the cutting board with the flannel and tape it to the back of the board. Open the curtain rods and fasten to the long sides of the board with the large binder clips. Stand the board against a wall or bookcase to use. I put mine in front of a cabinet in my sewing room.
It went together very quickly. When finished using it, it can be folded up and stored.
My next project will be to make a small board from a tri-fold display board. I already have one covered with felt. All I need to do is to add the curtain rods. It will be a nice size to set up near my sewing machine for smaller projects.
- Jun
- 9
Bridal Path + 9 to 4
Posted Wednesday, June 9th, 2010 in Fabrics, Patterns, Quilt Blocks, Quilt Guilds, Quilting | Read More
I won six Bridal Path blocks at the Appleseed Quilters Guild meeting on June 1. I bought white fabric with black polka dots to use as plain blocks between the pieced blocks and I purchased black with mini dots to use for binding. When I got home I realized I didn’t have enough of the white to make four 12 1/2 inch squares. Not wanting to wait until I could go shopping again, I decided to use the fabric I had and made four pieced (9 to 4) blocks instead of the plain squares. By cutting the binding a bit smaller than usual, I had just enough to make the binding.


Welcome to Quilting Linda
Within you'll find info about quilting, including my projects soon to be featured below, as well as tidbits about my friends & family. Enjoy!

- Categories
- Accuquilt Go cutter
- Amy Butler
- baby quilt
- Bonnie Hunter mystery quilt
- Celtic Solstice
- Christmas gift
- Decorated Cookies
- Dots on Dots Blog Hop
- Embroidered Quilt Label
- Fabric Stash
- Fabrics
- Family
- Five Little Monkeys
- Gingerbread House
- Grand Illusion
- Heather Bailey
- Hello Moon Block of the Month
- Hello Sun Block of the Month
- jelly roll
- Layer Cake
- Magazines
- Moda charm pack
- Moda City Girl fat quarters
- My Projects
- mystery quilt
- Patterns
- Personal
- Piecemakers Quilt Group
- place mat
- QAL
- Quilt Blocks
- Quilt Classes
- Quilt Guilds
- Quilt Shows
- Quilting
- Quilting tools
- Scrap Quilts
- Sewing and Crafting
- Shop Hop
- table runner
- Tips and Tricks
- Twister quilt
- Twister Wreath
- Wall Hanging
- Websites
-
- By Date
- May 2019
- April 2019
- January 2019
- December 2018
- November 2018
- September 2018
- August 2018
- July 2018
- May 2018
- April 2018
- March 2018
- February 2018
- 2019
- 2018
- 2017
- 2016
- 2015
- 2014
- 2013
- 2012
- 2011
- 2010
- 2009

 © 2009 Linda West