
- Dec
- 24
Merry Christmas!
Posted Friday, December 24th, 2010 in Quilting | Read More

This year I decided to buy new ornaments and decorate the tree in gold.


Merry Christmas and Happy New Year!


- Dec
- 18
Quilt for 2011 New Year’s Baby
Posted Saturday, December 18th, 2010 in baby quilt, Piecemakers Quilt Group, Quilting | Read More
Every year my small quilt group, Piecemakers, makes a quilt to be given to the first baby born in the new year at Community Memorial Hospital. This year we each made disappearing four patch blocks using bright fabrics. Carol put them together using black polka dot sashing fabric and I quilted it with bright variegated thread. Colleen is adding the binding, using the same black polka dot fabric.
Welcome baby!

- Dec
- 11
Piecemakers Christmas Party
Posted Saturday, December 11th, 2010 in Christmas gift, Quilt Guilds, Quilting | Read More
Thursday night my quilt group met for a pot luck dinner, games, and gift exchange. The meal was delicious and the fellowship was wonderful. We each brought 2 fat quarters for prizes for Christmas Bingo and a gift. For the exchange we could chose a gift from under the tree or could take a gift that someone had opened. The first gift I opened was taken and I got to choose another gift. The gift I brought home was hand made. It is a wooden waste basket with a quilt block painted on it. The basket holds a plastic grocery bag by slipping the handle opening over the handles on the basket. I also received two mini-bolts of green fabric. They are the same shades of green as the two fat quarters that I won playing Bingo!

- Nov
- 22
Brown Bear, Brown Bear, What do you see?
Posted Monday, November 22nd, 2010 in baby quilt, My Projects, Quilting | Read More

This baby quilt, book, and bear are for the baby of my son’s friend. The quilt is made from fabric designed by Eric Carle, the illustrator of the book, Brown Bear, Brown Bear, What Do You See?. The fabric has pictures of the animals that are in the book. I fussy cut them for the large squares that surround the center block.
I found the pattern in a magazine that was loaned to me by a friend and bought the book and stuffed bear at Kohl’s.
I made the quilt top using a red fabric for the star points and forgot to pre-wash the fabric. I was concerned that the red would bleed, so I took it apart and used a pre-washed red/orange fabric for the triangles. Luckily, I had not added the last border before I realized my mistake.

- Oct
- 22
Online Birthday Block Exchange-2010
Posted Friday, October 22nd, 2010 in Quilt Blocks, Quilting | Read More
This year I have been in birthday block exchanges on two online quilting forums. The exchange at the Garden Web Quilting Forum has 13 members and we each receive 12 blocks on our birthdays. I have requested the same block from both forums so that I will have enough blocks to make a quilt. The other forum is called “The Other Room” and has eight members in the exchange.
These blocks are from the group called “Carolina Lilies” at the GW Quilting Forum. I received two blocks from one of the members but only show one in this picture. It is a beautiful block and will definitely be used when I put the blocks from both forums together.
The blocks are on my design wall and I will rearrange them when I receive the rest of the blocks.

The little yellow squares that you see on each block is a post-it with the name of the person who made the block.
- Oct
- 22
Appleseed Quilters Guild Monthly Mini
Posted Friday, October 22nd, 2010 in Quilting | Read More
Each month at the Appleseed Quilters Guild meeting, a small quilted wall hanging or other quilted object is raffled to help raise money for programs. I was asked to provide a “monthly mini” for December, 2010. I was working on table runners and that was my first idea. Later I decided to make a snowman wall hanging at a Piecemakers workshop. At the suggestion of a friend, I made a smaller version of the wall hanging for the monthly mini rather than the longer version. I finished the wall hanging in time to take it to show and tell at the October meeting of the guild.

- Oct
- 3
October Table Runner – 2010
Posted Sunday, October 3rd, 2010 in Quilting | Read More
This month I did not piece the center of the table runner, but used a solid piece of fabric. I plan to quilt it with a meander pattern using black thread.

- Sep
- 16
Double Wedding Ring Quilt-finished!
Posted Thursday, September 16th, 2010 in Quilting | Read More
I started this quilt after Jen and Trist’s wedding in September 2008. I worked on it through the winter and finished piecing the top in the spring of 2009. I was undecided on how to quilt it. Carol offered to let me use her HQ 16 to quilt it, but I was intimidated by the large areas that needed a special design.
I saw the work done by Kat Waterson, a long-arm quilter, at an Appleseed Quilters Guild meeting. Her work is beautiful so I talked to her about scheduling a time to quilt the DWR. Since this was a custom job, she had to have a full week open to put it in her schedule. The earliest date available was the end of July 2010. I took it to her a few days before the scheduled time and selected the pattern and thread color. It took her about 4 days to quilt it.
I had to trim the edges and put the binding on. I took it to the church to lay it out on the large tables, and trimmed the edges. The binding had to be cut on the bias because of the scalloped edges. The next step was to sew the binding to the front of the quilt by machine and then stitch it to the back by hand. The hand stitching took me approximately eight hours.


I made a label to sew on the back and a set of pillowcases from the extra fabric.

They will receive the quilt and pillowcases for their second anniversary on September 27, 2010.
- Sep
- 4
Table Runner September 2010
Posted Saturday, September 4th, 2010 in My Projects, Patterns, Quilting | Read More

This is the table runner for September. I did not put the appliques in the border squares as suggested in the pattern. I thought of scattering swirls or leaves in the border but decided not to add anything .
- Aug
- 15
Edyta Sitar Quilt Class
Posted Sunday, August 15th, 2010 in Fabrics, My Projects, Patterns, Quilt Guilds, Quilt Shows, Quilting | Read More
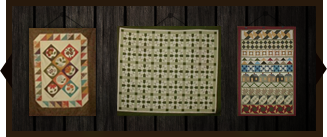
Edyta Sitar was the featured artist at the Appleseed Quilt Show at the Coliseum in Fort Wayne, Indiana last week. She taught a workshop called Hannah’s Sugar Baskets which I attended. The cost of the class included a kit of fabric. She gave us enough fabric to make the 12 baskets plus extra, triangle paper for 700 HSTs, recipe cards with the patterns, a folder with quilt layout sheets, and her 2011 calendar that includes 3 patterns. The fabric for the class was cut into strips and ready to make half square triangles using the triangle paper.
She had each of us (21 students) sew five sheets of HST (half square triangles), cut them apart and share with the class. We kept 7 HSTs from each sheet and put the rest into 21 piles. When everyone was finished sewing and cutting, we each received one of the piles of HSTs. This created a very nice variety of fabrics and colors that all coordinated.
After lunch we removed the paper from the HSTs and trimmed the ‘dog ears’ from the squares. She then demonstrated how the basket blocks were assembled, giving us hints on color placement. She also gave us tips on choosing fabric patterns. She told us to choose five prints,small, medium, and large size, dots, and stripes. We then assembled blocks until the end of the class.
During the class, Edyta displayed many of her finished quilts, showing them as she taught the class.
I attended this class with two of my very good friends, Cheryl and Kris. During the two hour lunch break, we visited the vendors and viewed some of the quilts displayed in the quilt show.
I returned to the Coliseum the next day to meet another good quilting friend,Sharon. I met her on an online quilting forum a few years ago.
Below are the baskets I made with the HSTs from the class.

- Aug
- 1
August Table Runner – 2010
Posted Sunday, August 1st, 2010 in Quilting | Read More

This is the unfinished table runner for August. I have to stitch the appliques to the background and then quilt it. The colors are not showing true. Some of the borders squares appear blue, but are a dark green and the asparagus is a green fabric.
- Jul
- 31
Double wedding ring quilt is quilted!
Posted Saturday, July 31st, 2010 in Family, Quilting | Read More
I made a double wedding ring quilt for my daughter and son-in-law for their wedding almost two years ago. I finished the top but was stalled by the quilting process. I wanted to quilt it myself but was very intimidated by the pattern.
I had checked with a longarm quilter and her rates were astronomical for a double wedding ring quilt. I met another longarm quilter and checked her rates which were much more acceptable. I scheduled a quilting time with her in December 2009 and found she did not have an opening until July, 2010. I took it to her on July 13 with a scheduled date of the week of July 26. (She reserves an entire week for a double wedding ring quilt.)
I received a call from Kat on Thursday afternoon, July 29, saying the quilt was finished! I picked it up on Friday afternoon. It is beautiful!
The next step is the binding. It has a scalloped edge all around the quilt. I will have to make a bias binding much more narrow than I normally use . My goal is to have it finished by September 27, Jen and Tristan’s second anniversary.
The longarm quilter is Kat Waterson. Her website: http://www.quiltingkat.com
- Jul
- 17
“Peekaboo Monkeys” part 2
Posted Saturday, July 17th, 2010 in Fabrics, Family, My Projects, Patterns, Quilting | Read More

The quilt is finished! I bought the book and fabric kit in December and it sat on my sewing table while I worked on lots of other quilts this year. I decided to work on it while on vacation last week. The applique is the reason for the delay. Applique is NOT my favorite thing to do! It went together very quickly and was fun, even doing the applique! I used a straight utility stitch on my Viking Quilt Designer for the embroidery on the faces rather than hand work. It isn’t perfect but as a friend says, “Finished is better than perfect.”


- Jul
- 11
Piecemakers Workshop
Posted Sunday, July 11th, 2010 in Patterns, Quilt Blocks, Quilting, Websites | Read More

On Saturday, July 10, nine members of Piecemakers Quilt Group met at Grace United Methodist Church for a workshop and pot luck lunch. This is an annual event where we all work on our own projects but use the same pattern. This year we decided to not start a new project, but to bring an unfinished object (UFO) to complete. This event was so successful that we now plan to hold another workshop in the fall.
The project that I took to the workshop was the Fun and Done quilt that I started at the workshop last year. It is a quilt- as- you- go pattern. I had completed 48 blocks and had them joined into rows. On Saturday I top-stitched the sashing pieces that finish the quilt. When the workshop ended I had all the sashing finished and just had to top-stitch the binding which I did at home.

The finished quilt is approximately 45 X 60 inches.

To see more Fun and Done patterns go to http://www.prairieskyquilting.com
- Jul
- 9
Winter Scene Wall Hanging
Posted Friday, July 9th, 2010 in Fabric Stash, Fabrics, My Projects, Quilting, Wall Hanging | Read More

I first saw this quilt at The Door Mouse in Bettsville, OH when my friend Elsie and I visited the shop in 2008. I purchased the center panel but they did not have all the other fabrics in stock. When I went to The Door Mouse last year (2009) they had them in stock again and I purchased the rest of the fabrics and finished the top. It then went into my pile of unquilted tops.
In June 2010, I put it in the frame and quilted it. The finished size is 50″ X 50″. I plan to hang it on the wall behind my quilt frame during the winter months.
The pattern can be found at
http://www.michaelmillerfabrics.com/MMF/DownLoad.cfm?Gid=1220
It is located near the bottom of the page and is named “Snow Chateau”.
- Jul
- 4
July 2010 Table Runner
Posted Sunday, July 4th, 2010 in Fabrics, My Projects, Patterns, Quilting, table runner | Read More

This is the July table runner from the Calendar Table Runners pattern that I have been using all year. This month I followed the pattern suggestions for all the colors and appliques. I have a piece of fabric for the backing that has red and blue stars on a white background.
- Jun
- 19
Columbus, Ohio quilt show
Posted Saturday, June 19th, 2010 in Fabrics, Moda charm pack, Patterns, Quilt Shows, Quilting, Websites | Read More
My daughter and I went to the National Quilt Show on Thursday, June 17. Jennifer lives just a few minutes from the Convention Center where the show is held. We arrived at the show about 10:30 AM and shopped at the vendors and admired quilts until about 4:00 PM. Here are some of the items we bought.


These are the patterns and kit that Jennifer bought for herself. She insisted on buying me most of the items that I chose as a belated Mother’s Day gift as well as buying my ticket , lunch, and some wonderful ice cream when we left the show.

I met Marie Bostwick, the author of this book. I told her I was her friend on facebook and she gave me a hug. She asked if we had a camera. Jennifer used her cell phone to take a picture of us together. http://mariebostwick.com/


We also met Rebecca Barker, the artist of Quiltscapes. Here is a link to her art. http://www.barkerquiltscapes.com/
I bought a new Quiltscapes mouse pad for my desk at home. I have the “spools” mouse pad on my desk at work.

I had a wonderful time with my daughter and thoroughly enjoyed the quilt show. We plan to make this an annual event.
- Jun
- 15
June Table Runner
Posted Tuesday, June 15th, 2010 in My Projects, Patterns, table runner | Read More

This month I followed the pattern colors but did not put the applique in the border squares. I plan to use a small satin stitch for the applique. I am looking for small black buttons in the shape of watermelon seeds instead of the suggested appliqued seeds. The runner is diplayed on the small design board that I made this week.
I had strips of red fabric left over from a bento box quilt that I made in Ohio State colors for my daughter. I like the variety of reds in the watermelons.
Update: 6/21/2010
I stitched the appliques with a small satin stitch. The pattern called for small black appliqued seeds on the watermelon. Not wanting to applique the small pieces, I stitched the seeds using stitch number 36 on my Janome 10001.

- Jun
- 14
Smaller design wall
Posted Monday, June 14th, 2010 in My Projects, Quilt Guilds, Quilting, Sewing and Crafting, Tips and Tricks | Read More


I had a tri-fold display board that I had covered with flannel several years ago when I taught a class. All I had to do was add the curtain rods. In the second picture you can see how the curtain rods are attached with the binder clips.
Just click on the picture to enlarge it.
- Jun
- 13
My new design wall
Posted Sunday, June 13th, 2010 in Quilt Guilds, Sewing and Crafting, Tips and Tricks | Read More

I made this portable design wall from instructions given at the Appleseed Quilters Guild meeting in April. Items needed are a dressmaker’s cardboard cutting board, two metal curtain rods (72″ white rods that curve at the ends), a piece of flannel or felt 44″ X 80″, 10 large binder clips, and painter’s tape or double sided carpet tape. To make a smaller design wall, a tri-fold display board can be used.
I made mine from items that I had on hand except for the cutting board and curtain rods. I owned a dressmaker’s cutting board but it disappeared long ago. My friend Liz gave me her old cutting board. I purchased the curtain rods at Dollar General for $3.50 each. I had a box of large binder clips, painter’s tape, and a nice piece of white flannel.
Cover the cutting board with the flannel and tape it to the back of the board. Open the curtain rods and fasten to the long sides of the board with the large binder clips. Stand the board against a wall or bookcase to use. I put mine in front of a cabinet in my sewing room.
It went together very quickly. When finished using it, it can be folded up and stored.
My next project will be to make a small board from a tri-fold display board. I already have one covered with felt. All I need to do is to add the curtain rods. It will be a nice size to set up near my sewing machine for smaller projects.

Welcome to Quilting Linda
Within you'll find info about quilting, including my projects soon to be featured below, as well as tidbits about my friends & family. Enjoy!

- Categories
- Accuquilt Go cutter
- Amy Butler
- baby quilt
- Bonnie Hunter mystery quilt
- Celtic Solstice
- Christmas gift
- Decorated Cookies
- Dots on Dots Blog Hop
- Embroidered Quilt Label
- Fabric Stash
- Fabrics
- Family
- Five Little Monkeys
- Gingerbread House
- Grand Illusion
- Heather Bailey
- Hello Moon Block of the Month
- Hello Sun Block of the Month
- jelly roll
- Layer Cake
- Magazines
- Moda charm pack
- Moda City Girl fat quarters
- My Projects
- mystery quilt
- Patterns
- Personal
- Piecemakers Quilt Group
- place mat
- QAL
- Quilt Blocks
- Quilt Classes
- Quilt Guilds
- Quilt Shows
- Quilting
- Quilting tools
- Scrap Quilts
- Sewing and Crafting
- Shop Hop
- table runner
- Tips and Tricks
- Twister quilt
- Twister Wreath
- Wall Hanging
- Websites
-
- By Date
- May 2019
- April 2019
- January 2019
- December 2018
- November 2018
- September 2018
- August 2018
- July 2018
- May 2018
- April 2018
- March 2018
- February 2018
- 2019
- 2018
- 2017
- 2016
- 2015
- 2014
- 2013
- 2012
- 2011
- 2010
- 2009

 © 2009 Linda West
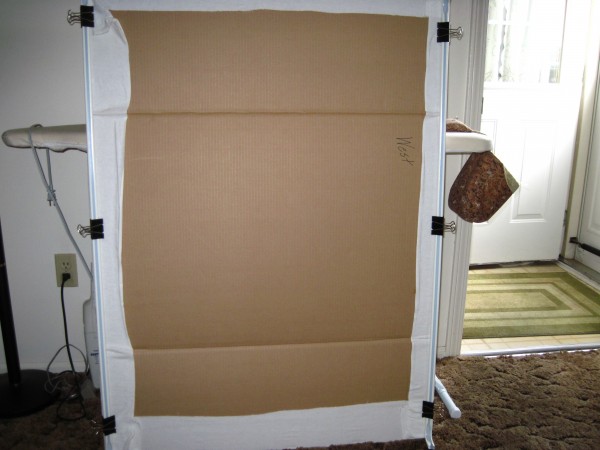