
- Dec
- 13
In the Pumpkin Patch
Posted Wednesday, December 13th, 2017 in Fabric Stash, Magazines, Patterns | Read More
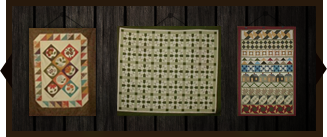
I started this quilt last fall. It is another quilt by Bonnie Hunter and was in Quiltmaker magazine. The instructions in the magazine were not written by Bonnie. The pumpkins were supposed to be paper pieced but I skipped that and made strip sets. I then cut them into the size pumpkins I wanted and added corner blocks.
The orange fabric I used was from a fat quarter bundle that I ordered online. Most of the background fabric was given to me by a very dear friend from back home. I had given her a ticket for a bus trip to a quilt show that I was unable to attend. She surprised me with a gift bag STUFFED FULL of fabric. Included with lots of other fabrics were text prints. She knew I loved text prints but didn’t have any in my stash. I saved them for a special quilt and this is the quilt I chose to use them in. Thank you Kris! I love this quilt!
I still need to hand stitch the binding to the back but it will have to wait until all the Christmas quilting is finished! To see a close up of the text prints, click on the picture.


- Nov
- 25
Bonnie Hunter’s “On Ringo Lake” Mystery Quilt
Posted Saturday, November 25th, 2017 in Bonnie Hunter mystery quilt, Fabric Stash, Quilting | Read More
One of my favorite quilt teachers is Bonnie Hunter. She is the queen of scrap quilts and is a great teacher. Since I have been following her, I am actually using my scrap fabric. I have it organized by color but I haven’t cut it into the sizes that she recommends.
Every year she presents a mystery quilt on her blog, Quiltville’s Quips and Snips. It begins on Black Friday and usually ends around New Years Day. This year she says it may go a little longer into the month of January because of her busy schedule. Her new quilt is called “On Ringo Lake” and the colors are based on the sunrise she saw while on vacation at Ringo Lake in Minnesota. She again gave paint chip numbers to help us find the same colors that she used in her quilt.
The first clue was given the day after Thanksgiving and her followers, including me, have been busy cutting and sewing blocks for the first clue. A new clue will be given each Friday until the big reveal in January.
We had family here for the Thanksgiving holiday which we enjoyed immensely. They left on Friday afternoon. After getting a good nights rest, I started cutting strips for my first clue on Saturday morning. I had time to start sewing the blocks before we went to our daughter’s home to watch the OSU/Michigan game. As soon as we arrived back home, I went up to my sewing room to finish my blocks. Here they are!!!!

To see what other mystery quilters are doing, click here.
- May
- 16
Spring 2015 in Columbus
Posted Saturday, May 16th, 2015 in Fabric Stash, My Projects | Read More
Wow! It has been a long time since I posted anything except Zelda blocks. This has been a week of finishing some of my projects.
Jen and I took a class at Quilt Trends this spring using a Judy Niemeyer pattern. Judy’s patterns are paper pieced and that was never very high on my list of things to do. I do have to say that I really enjoyed the class and am ready to make another PP quilt.
Quilt Trends made up kits of fabric for this class. We purchased the kits and I loved the fabrics they selected. Jen and I have identical fabrics but we chose to pair them differently. This week I put the final border on my “Island Sunrise” quilt from the class. My plans are to hang it in my entrance way when it is quilted. The colors in the quilt are more intense than they are in the picture. (This was taken with my phone.)

Last fall I bought a pattern to make a wall hanging for my kitchen. The pattern was purchased at Quilt Beginnings in Columbus and is from Fig Tree Quilts. I bought two red FQs but the rest of the fabric I used is from my stash.

I wanted to find another pattern to go with the pears but could not find what I wanted. When I received the “Farm Girl Vintage” book that I had ordered from Lori Holt, I found a cherries block that was just what I had in mind for the second wall hanging. I used the leftover scraps from the pear quilt and added a few more red fabrics from my stash. I designed the quilt using the cherries blocks to be similar in size to the pears quilt.

I have several other projects to show you but they will have to wait until I take more pictures.
- Dec
- 11
Grand Illusion Mystery Quilt – Part 2
Posted Thursday, December 11th, 2014 in Fabric Stash, Grand Illusion, Quilting, Scrap Quilts | Read More
This week we are making 200 pink, black and white rectangles and sewing two together to make 100 blocks. Bonnie gave us three different ways to assemble the rectangles. I chose to use the second method.
I printed the template for the diamond and taped it to the EZ Angle ruler to cut the diamonds. I wanted to try to make a block before cutting 200 pieces and took the template off my ruler to cut a few triangles. The pieces fit together perfectly.
I like to sew assembly line style. After sewing all 200 rectangles, I pressed them. Next I pieced all the blocks together and again did all the pressing.

To see the progress of other mystery quilters, click on this link.
- Dec
- 1
Grand Illusion Mystery – Part 1
Posted Monday, December 1st, 2014 in Fabric Stash, Quilting | Read More

The first clue has arrived and I am busily sewing blocks. My Thanksgiving guests left early Friday morning and I started cutting my fabric in the afternoon. On Saturday I was busy putting up Christmas decorations but did squeeze in some time for sewing. I now have all 288 half square triangles finished and sewn to the solid squares, reserving 80 for another clue to come later. The block assembly has begun! I am making 100 Broken Dish blocks.
I used Triangulations to make the HSTs (half square triangles) rather that using the EZ angle ruler. I’m not sure it saved any time because of having to remove the paper but my blocks all finished perfectly.
All the fabric for this quilt came from my fabric stash. I found that the pink fabric matches the paint chip perfectly. I had been saving this fabric for something special and the time to use it has arrived! To see all the fabric I am using, click here.
If you are also making this mystery quilt, you can link up to Bonnie Hunter’s blog with this link.
- May
- 18
Great Granny Squared Sew Along
Posted Sunday, May 18th, 2014 in Fabric Stash | Read More
I finished the Great Granny Sew Along quilt top today. All the fabrics for this quilt top came from my scraps and stash.
We were given our choice of two ways to finish the top. I chose Kim’s version. Both quilts used the same size pieces. The only difference is how they are sewn together.

I plan to put it on the quilt frame later this week or next week after Memorial Day.
- Jan
- 25
BOM 2014 – January -Chilly Silly Snowmen
Posted Saturday, January 25th, 2014 in Accuquilt Go cutter, Fabric Stash | Read More
Here we go again! I found a cute, free, BOM that I just had to make. I made a few changes to the construction of the blocks but not the appearance. For Christmas, Bob gave me a Snowball die for my Accuquilt Go Cutter that is the same size as the snowman face. Rather than cut lots of two inch squares and sew them back together, I used the die to cut the white fabric. It also cut the blue fabric for the corners on the white squares. I cut strips for the side pieces of the block rather then piece them. The eyes are 3/4 inch black buttons. I sewed the buttons onto the faces before I joined the blocks together.

The pattern is from Quilt Doodle Doodles. The directions are very clear and easy to follow. I think I have found a new favorite blog to follow!
- Sep
- 17
Dots on Dots Blog Hop & Giveaway
Posted Monday, September 17th, 2012 in Dots on Dots Blog Hop, Fabric Stash | Read More

I have been collecting dot fabrics without a project in mind for several months. When a friend invited me to join the Dots on Dots blog hop, I hopped right in! I have been running ideas for a house quilt around in my mind for months but nothing was coming together until I decided to do it with my dot fabric. I did a search in EQ7 for house blocks and came up with the Crazy House block pattern.

This is my coloring of the block in EQ 7. I made it with some scraps of bright dot fabrics in my stash but was not completely happy with the results.

I made another block using orange in the center and fabric closer to the colors in the EQ7 block.

Now on to the house blocks.

I found trees and houses in EQ 7 and made them with the dotty fabrics. Two of the houses had set in seams but I redrew the patterns to avoid the difficult seams. I set the Crazy House block in the center and surrounded it with the dotty trees and houses.
I have enjoyed sewing with all the dotty fabrics. Here is a chance for you to win some dots and make a quilt. Make a comment on this post and tell me which block you like the most. (To see larger images, click on the pictures.) This is what you can win…

… four fat quarters and a pinwheel quilt pattern by Maple Island Quilts.
I will draw a winner on September 20. Good Luck!
These are the other bloggers featured today.
- Jul
- 12
Hello Sun BOM in July
Posted Thursday, July 12th, 2012 in Fabric Stash, Patterns | Read More
sm")
This month the Block of the Month pattern did not have a picture of the finished block. I usually follow the suggested colors in the block but had to use my imagination this time. Since the sun is setting, I changed the background from the white fabric used in the previous blocks to an orange/yellow to resemble the sky at sunset. The post the gull is perched on is cut from a stripe in a fat quarter of African fabric. It was the only piece in my stash that resembled wood grain.
- Jun
- 19
Another Mini Quilt in June
Posted Tuesday, June 19th, 2012 in Fabric Stash | Read More
Several years ago I bought a few kits at Joann’s that were clearance priced. I was cleaning out my sewing room and found this kit. It only took an afternoon to cut and piece it together.

- Jun
- 19
Drunkards Path Table Runner
Posted Tuesday, June 19th, 2012 in Fabric Stash, table runner, Twister quilt | Read More
When blocks for a Twister quilt are cut, a square of fabric is leftover between each block. The square is not on the straight of grain. Care must be taken when working with these leftovers because of the stretchy bias edges. I used my Go! Cutter to cut out small Drunkards Path (DP) blocks with the squares left from a Twister quilt made with a layer cake.
This is the first project I made with the small DP die. What fun using every bit of fabric from a layer cake!

- Jun
- 2
Mini Quilts
Posted Saturday, June 2nd, 2012 in Fabric Stash, Fabrics, Quilting | Read More
Last month I refolded all the fabric in my armoire and found two kits for small wall hanging quilts. I ordered them both from Connecting Threads several years ago. I worked on both of them over Memorial Day weekend.
This quilt kit was called “I Love to Quilt Spools” and included the pattern and fat quarters of fabric.

This second quilt is called “Flowers from the Scrapbag”. It also included a pattern and fat quarters. When I completed the top I had enough fabric leftover to piece together for the backing.
I fused the flowers to the quilt and machine blanket stitched in matching thread around each applique. The stems are pieced into the background fabric.


- Mar
- 22
Going Around in Circles!
Posted Thursday, March 22nd, 2012 in Fabric Stash | Read More
Bob gave me an Accuquilt Go cutter for Christmas in 2010. I bought a seven inch Drunkard’s Path die because that is a shape that is difficult to cut with a rotary cutter. Wanting to try out the die, I went through my stash and pulled out brown and green fabrics.
")
")
I don’t usually name my quilts but this one wants to be called “Going Around in Circles”. It has been made entirely from fabrics in my stash. I like the way the circles seem to float on the quilt.
The finished size is 56″ X 84″ and consists of 96 Drunkard’s Path blocks.
- Jul
- 15
Modern Row Robin Quilt Along
Posted Friday, July 15th, 2011 in baby quilt, Fabric Stash | Read More
Last week a quilting friend sent me an email with a link to a Row Robin that does not require exchanging rows with other quilters. Five bloggers are creating this row quilt by posting a new row each Monday for five weeks. I have completed two rows at this time. I am using fat quarters from Moda’s City Girl line of fabric.
The finished quilt should be 48″ X 60″. I think it will make a nice baby quilt.
Row 1 was posted by Lisa Marie from That Crazy Quilty Girl

Row 2 was posted by Melissa from Lilac Lane


I did not place my row 2 blocks in the same order as the designer. I want the largest star to move into the row from the end because it only has four points, progressing down the row to the smallest stars.
If you would like to quilt along, visit the sites listed below.
Row 1- Lisa Marie from That Crazy Quilty Girl
Row 2- Melissa from Lilac Lane
Row 3- Heather and Megan from Quilt Story
Row 4- Anne Marie of Gen X Quilters
Row 5-Jen at ReannaLily Designs Blog
Check back next week to see my next row!
- Jun
- 22
“Pin Up” Quiltlets – A quilt pin display
Posted Wednesday, June 22nd, 2011 in Fabric Stash, Fabrics, Quilting | Read More
Bob and I drove to Gahanna on June 16 to visit Jennifer and Tristan. Jennifer and I went to the 42nd Annual NQA quilt show at the Greater Columbus Convention Center the next morning. We took lots of pictures of quilts and bought lots of neat quilting items. The item that really caught my attention was a pattern by Quiltricks, a trio of quiltlets to display a quilt pin collection. They are displayed on a tabletop quilt rack.
Bob and I returned home on Saturday evening. The next afternoon I went through my scraps and cut out the pieces for the quiltlets and pieced and quilted the tops. On Monday after work I completed the binding, hand stitching it to the backs of the quilts.

- May
- 30
Twister Wreath
Posted Monday, May 30th, 2011 in Fabric Stash, Quilting, Sewing and Crafting, Twister Wreath, Wall Hanging | Read More

This small wall hanging was made from fabric from my stash. I saw a picture of a twister wreath and wanted to try it. (Thank you new2quilting.) It went together very quickly.
I used five inch squares: 9 background, 8 red, and 8 green squares.

The next step is to sew them into rows.

Add 3 inch borders, using the background fabric.

The next step is to cut it apart using the Lil’ Twister tool.

Place the squares into rows in the same order they were cut.

Sew the squares into rows and join the rows together.

The final step is to add a border. I cut two strips 1 1/2 inches wide the width of the fabric. The finished size of the quilt is 20 1/2 inches.
- Mar
- 12
Little Twister
Posted Saturday, March 12th, 2011 in Fabric Stash, Fabrics, Quilting | Read More
Last week I made a Twister quilt from ten inch squares of fabric. When the blocks are cut, there is leftover fabric between each square. I decided to use this fabric to make a small Twister quilt.
Twister quilts are made by first sewing squares of fabric together and adding a border. I took the leftovers and squared them up and sewed them together. I added a 3 inch border. The next step was to cut the pinwheel squares. Place the template on the quilt (with the lines on the intersecting seams) and cut around it. Continue cutting each row until all the squares are cut across the top.


The next step is to sew the blocks back together in the same order they were cut. This creates the Twister pattern. The final step is to add a border to the quilt. This is necessary to stabilize the quilt because all the edges of the blocks are on the bias.

The finished size of the small Twister is 25 1/2 inches.
- Mar
- 6
Let’s twist!
Posted Sunday, March 6th, 2011 in Christmas gift, Fabric Stash, My Projects, Quilt Blocks, Quilting | Read More
Last week I went on a shop hop and bought the Twister tool. Let me explain… The Twister tool is used to cut pinwheel blocks from squares with no cutting of triangles or other angles. The first step is to sew squares into rows and then sew the rows together. Next a border is added. Now it is time to use the Twister tool. You line up the intersecting lines on the tool with the seams between the side and top borders and the first square and cut around it. Continue placing the tool on the following seams and cutting. When you have cut all the squares they are joined together into rows, etc.. After the blocks are all sewn together another border is added.
This is a picture of some of the rows on my design board.

These are the rows for the second half of the quilt.

Next with the rows sewn together again…

and now with the final border.

The fabrics used in this quilt were a collection of 1930’s ten inch squares that were given to me by my daughter for Christmas a few years ago. There were 35 squares in the pack so I added one square from my 30’s stash. She purchased them at the Keepsake Quilting store in New Hampshire.
Twister Tool:

- Mar
- 5
Getting an early start…
Posted Saturday, March 5th, 2011 in baby quilt, Fabric Stash, Fabrics, My Projects, Quilt Blocks, Quilt Guilds | Read More
Each year my small quilt group, Piecemakers, makes a baby quilt for the first baby born in the new year at CMH (Community Memorial Hospital). We decided we wanted to get started early this year so there is not a rush at the end of the year to get it quilted. I appreciate this since I am usually the person doing the quilting.
Carol and I went to a quilt shop in Roanoke, IN the last week in December, 2010, and found a nice panel to use for the center of the quilt. We decided to make a border of four-patch blocks using the colors found in the panel. The quilt group looked through our stash at the church and found colors to match. I cut the fabric into strips and they were taken home by several members.
Last Thursday the group arranged the four-patches around the panel and Kris and I sewed them into borders at the meeting. I brought them home and added them to the panel today.

As soon as I find fabric for the backing, I will load it on my quilt frame and do the quilting.
- Jan
- 30
Accuquilt Go Cutter- Tumbler Blocks
Posted Sunday, January 30th, 2011 in Christmas gift, Fabric Stash, Fabrics, Quilting | Read More
Bob bought me an Accuquilt Go fabric cutter for Christmas. On Christmas day, I cut over 100 squares using the die that came with the cutter. They were just the right size for the monthly table runners that I made last year. ( You can see them in the post about the November and December runners.)
I bought the 6 1/2 inch tumbler die and have been using it to cut up fabrics from my stash. I had a case with lots of fat quarters that I bought when I first began quilting. I sorted out the green, red, and blue fabrics for the dark blocks. For the light blocks, I cut up the cream and tan fabrics that were left from all the table runners.

I am going to alternate the dark and light blocks and sew them into rows.

Welcome to Quilting Linda
Within you'll find info about quilting, including my projects soon to be featured below, as well as tidbits about my friends & family. Enjoy!

- Categories
- Accuquilt Go cutter
- Amy Butler
- baby quilt
- Bonnie Hunter mystery quilt
- Celtic Solstice
- Christmas gift
- Decorated Cookies
- Dots on Dots Blog Hop
- Embroidered Quilt Label
- Fabric Stash
- Fabrics
- Family
- Five Little Monkeys
- Gingerbread House
- Grand Illusion
- Heather Bailey
- Hello Moon Block of the Month
- Hello Sun Block of the Month
- jelly roll
- Layer Cake
- Magazines
- Moda charm pack
- Moda City Girl fat quarters
- My Projects
- mystery quilt
- Patterns
- Personal
- Piecemakers Quilt Group
- place mat
- QAL
- Quilt Blocks
- Quilt Classes
- Quilt Guilds
- Quilt Shows
- Quilting
- Quilting tools
- Scrap Quilts
- Sewing and Crafting
- Shop Hop
- table runner
- Tips and Tricks
- Twister quilt
- Twister Wreath
- Wall Hanging
- Websites
-
- By Date
- May 2019
- April 2019
- January 2019
- December 2018
- November 2018
- September 2018
- August 2018
- July 2018
- May 2018
- April 2018
- March 2018
- February 2018
- 2019
- 2018
- 2017
- 2016
- 2015
- 2014
- 2013
- 2012
- 2011
- 2010
- 2009

 © 2009 Linda West