
- Aug
- 5
Bonnie Hunter’s Tropical Twist Workshop
Posted Saturday, August 5th, 2017 in My Projects, Quilt Guilds, Quilting | Read More
This has been a busy summer here in Columbus. We have been watching the granddaughters quite often (and enjoying every minute!). I did get to attend a workshop with Bonnie Hunter in June. We were working on the Tropical Twist quilt from her book, “Addicted to Scraps“. Bonnie is the queen of scraps, therefore, I tried to make the entire quilt from my scrap bin. I pulled the green, purple and blue scraps for the darker strips and a variety of light scraps for the background. On a few of the background strips, I used the back of the fabric as the right side to get a lighter shade. This was a tip that I had heard before but Bonnie reminded us of it at the workshop.
Another tip for this quilt was to use the leftover triangles (that are cut off in making the larger block) in the border. Bonnie has designed a nifty little ruler , the Bonus Buddy, that is made for this purpose. It was included with her triangle ruler that I purchased last year. At the lecture the night before the workshop, she mentioned that we would be using the Bonus Buddy. I went home and packed it for the next day. It works great! She said it will be available as a single item soon.

Tropical Twist


All of the blocks were made from my scraps. I do have to confess that I bought fabric for the aqua and yellow inner borders. I didn’t have enough of either of those colors to make an entire border.


- Jul
- 15
A Quilt for Charlotte
Posted Saturday, July 15th, 2017 in baby quilt, My Projects | Read More
Little Miss Charlotte is one year old! We had a party for her in June for just the family. Now we are having a party for friends of the family ( postponed due to illness in June). I gave her a toy on her birthday and saved her quilt for the second party.
I bought the pattern for this quilt at the QT ReVu in 2016.The pattern includes three different quilts but I chose the fish for Charlie because Under the Sea is the theme of her nursery. I also found a cute panel with a doll (mermaid) and accessories.


The second picture has the true colors of the quilt and doll. I love this fabric and think that aqua is now my favorite color.
I free motion quilted it in a water pattern with a few swirls thrown in here and there. Click on the picture for a close up view.
- Jun
- 28
Cut, Sew, Press, Quilt!
Posted Sunday, June 28th, 2015 in My Projects, Quilting tools | Read More
I have been so busy with the family that I have not posted some of the projects that I made this spring. We are loving the fact that we live so close to our family now. It is amazing to watch the babies grow and learn. (Although I doubt Eli would like to be called a baby. He is three years old!)
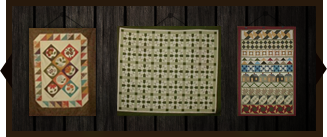
My daughter gave me a bundle of batik fat quarters, “Bobbins and Bits” by Pat Sloan, for Christmas last year. She also gave me a pattern by Lori Holt, Cut. Sew. Press. Quilt.. I had so much fun making these quilts. I was happy that I had “Alphabitties” to help me keep track of the pieces. I won them last year when doing a quilt along with Lori Holt.
I haven’t quilted them yet. I am still trying to decide if I want to quilt them or frame them. They will all be hung near the appropriate area in my new sewing room.


Don’t forget to come back for the next “Zelda: The Quilt-Along” block later this week!
Happy Quilting!
Linda
- May
- 16
Spring 2015 in Columbus
Posted Saturday, May 16th, 2015 in Fabric Stash, My Projects | Read More
Wow! It has been a long time since I posted anything except Zelda blocks. This has been a week of finishing some of my projects.
Jen and I took a class at Quilt Trends this spring using a Judy Niemeyer pattern. Judy’s patterns are paper pieced and that was never very high on my list of things to do. I do have to say that I really enjoyed the class and am ready to make another PP quilt.
Quilt Trends made up kits of fabric for this class. We purchased the kits and I loved the fabrics they selected. Jen and I have identical fabrics but we chose to pair them differently. This week I put the final border on my “Island Sunrise” quilt from the class. My plans are to hang it in my entrance way when it is quilted. The colors in the quilt are more intense than they are in the picture. (This was taken with my phone.)

Last fall I bought a pattern to make a wall hanging for my kitchen. The pattern was purchased at Quilt Beginnings in Columbus and is from Fig Tree Quilts. I bought two red FQs but the rest of the fabric I used is from my stash.

I wanted to find another pattern to go with the pears but could not find what I wanted. When I received the “Farm Girl Vintage” book that I had ordered from Lori Holt, I found a cherries block that was just what I had in mind for the second wall hanging. I used the leftover scraps from the pear quilt and added a few more red fabrics from my stash. I designed the quilt using the cherries blocks to be similar in size to the pears quilt.

I have several other projects to show you but they will have to wait until I take more pictures.
- Mar
- 19
Quilty Barn Along
Posted Tuesday, March 19th, 2013 in My Projects, QAL, Quilting | Read More
My friend Kris told me about another QAL (quilt- along) that I could not resist. Lori Holt at Bee In My Bonnet is hosting the QAL with tutorials.

This is the first barn with a Weathervane block made from 1930s fabrics.

The block in this barn is “Farm Fresh Flower“.
I made the first block twice. I had used fabrics from my scrap basket the first time. When I made the second block, I decided to use 1930 reproduction fabrics for the inserted blocks. I took the first block apart and inserted a new “Weathervane” block made from the ’30s fabrics.
- Jul
- 14
3 years later….Confetti Log Cabin
Posted Saturday, July 14th, 2012 in My Projects, Quilting | Read More
In February 2009, I took a class taught by Carol Vinnedge, a member of Appleseed Quilters Guild. I made three blocks during the class. I posted pictures of the blocks in one of my first posts on this blog. The blocks and fabrics for the quilt were put away as I worked on another quilt all the while thinking about this quilt. As you can see from the blog, lots of quilts have been started and finished since that date in February 2009.

One of my goals for 2012 is to finish some of the UFOs in my stash. In June I made 3 of the mini quilt kits that I bought years ago. The Confetti quilt was still nagging at me to be finished. Two weeks ago I got it out again and started working on the blocks. I like to chain piece and this is not a block that can be chain pieced easily. I did work out a method for piecing. I made lots of strips with the bright colors inserted into the white and black fabrics.

Next I cut the strips to the correct length and arranged them on a flannel board in the order they were to be sewn. I have three boards therefore I prepared three blocks at a time.

Rather than using the iron to press each seam (outside temperatures over 100 F), I finger pressed the strips and waited until three blocks were finished to press them. And finally…the last block was made today!
There are 35 blocks ( 7.5 inches finished size) in seven rows of five blocks across. There will be borders added to make a small quilt approximately 45″ X 59″.

- Feb
- 24
Hello Sun
Posted Friday, February 24th, 2012 in Hello Sun Block of the Month, My Projects | Read More
My friend Kris introduced me to this free Block of the Month at http://www.april-makingendsmeet.blogspot.com/ . I made the strata of yellow strips and put it away while I worked on another quilting project. Yesterday I got it out again and made the blocks for January and February. Doesn’t this just make you feel happy? I love working with the yellow fabrics.
I did all the appliques by machine by setting the stitch length to 1.5 straight stitch and using black thread. I made a few modifications to the pattern so that I would not have to do any hand work. I like that it looks like a child drew it.

January Hello Sun Block

February Hello Sun Block
- Sep
- 25
Happy Quilting Stars Quilt-Along Table Runner
Posted Sunday, September 25th, 2011 in My Projects, Scrap Quilts, table runner | Read More

This table runner was made of scraps from the Modern Row Robin quilt-along that I participated in earlier this summer. The binding will be scrappy.
I finished this top last evening to take a break from the Double Wedding Ring quilt that has consumed my sewing time this summer.
- Mar
- 27
…and now the place mats
Posted Sunday, March 27th, 2011 in Fabrics, My Projects, place mat, Quilting | Read More
I had four squares left from the panel I used for the table runner. I also had leftover triangles from the Essence quilt I made in 2009. By combining the triangles with background fabric I bought for the table runner and the four squares, I was able to make four place mats. They were too short so I added a 2 inch strip to the top and bottom of each mat. I rounded the corners using a small sauce dish for the pattern.

Close up of mats:


- Mar
- 6
Let’s twist!
Posted Sunday, March 6th, 2011 in Christmas gift, Fabric Stash, My Projects, Quilt Blocks, Quilting | Read More
Last week I went on a shop hop and bought the Twister tool. Let me explain… The Twister tool is used to cut pinwheel blocks from squares with no cutting of triangles or other angles. The first step is to sew squares into rows and then sew the rows together. Next a border is added. Now it is time to use the Twister tool. You line up the intersecting lines on the tool with the seams between the side and top borders and the first square and cut around it. Continue placing the tool on the following seams and cutting. When you have cut all the squares they are joined together into rows, etc.. After the blocks are all sewn together another border is added.
This is a picture of some of the rows on my design board.

These are the rows for the second half of the quilt.

Next with the rows sewn together again…

and now with the final border.

The fabrics used in this quilt were a collection of 1930’s ten inch squares that were given to me by my daughter for Christmas a few years ago. There were 35 squares in the pack so I added one square from my 30’s stash. She purchased them at the Keepsake Quilting store in New Hampshire.
Twister Tool:

- Mar
- 5
Getting an early start…
Posted Saturday, March 5th, 2011 in baby quilt, Fabric Stash, Fabrics, My Projects, Quilt Blocks, Quilt Guilds | Read More
Each year my small quilt group, Piecemakers, makes a baby quilt for the first baby born in the new year at CMH (Community Memorial Hospital). We decided we wanted to get started early this year so there is not a rush at the end of the year to get it quilted. I appreciate this since I am usually the person doing the quilting.
Carol and I went to a quilt shop in Roanoke, IN the last week in December, 2010, and found a nice panel to use for the center of the quilt. We decided to make a border of four-patch blocks using the colors found in the panel. The quilt group looked through our stash at the church and found colors to match. I cut the fabric into strips and they were taken home by several members.
Last Thursday the group arranged the four-patches around the panel and Kris and I sewed them into borders at the meeting. I brought them home and added them to the panel today.

As soon as I find fabric for the backing, I will load it on my quilt frame and do the quilting.
- Jan
- 21
November and December Table Runners
Posted Friday, January 21st, 2011 in Fabrics, My Projects, table runner | Read More
I didn’t have time to work on the last two runners until after the Christmas holidays. Bob gave me an Accuquilt Go cutter for Christmas and the die that came with it has a 4 1/2 inch square. That is the size I use for the blocks in the center and borders of the runners. I still have to stitch the appliques and quilt them but here are pictures of the unfinished table runners.


- Nov
- 22
Brown Bear, Brown Bear, What do you see?
Posted Monday, November 22nd, 2010 in baby quilt, My Projects, Quilting | Read More

This baby quilt, book, and bear are for the baby of my son’s friend. The quilt is made from fabric designed by Eric Carle, the illustrator of the book, Brown Bear, Brown Bear, What Do You See?. The fabric has pictures of the animals that are in the book. I fussy cut them for the large squares that surround the center block.
I found the pattern in a magazine that was loaned to me by a friend and bought the book and stuffed bear at Kohl’s.
I made the quilt top using a red fabric for the star points and forgot to pre-wash the fabric. I was concerned that the red would bleed, so I took it apart and used a pre-washed red/orange fabric for the triangles. Luckily, I had not added the last border before I realized my mistake.

- Sep
- 4
Table Runner September 2010
Posted Saturday, September 4th, 2010 in My Projects, Patterns, Quilting | Read More

This is the table runner for September. I did not put the appliques in the border squares as suggested in the pattern. I thought of scattering swirls or leaves in the border but decided not to add anything .
- Aug
- 15
Edyta Sitar Quilt Class
Posted Sunday, August 15th, 2010 in Fabrics, My Projects, Patterns, Quilt Guilds, Quilt Shows, Quilting | Read More
Edyta Sitar was the featured artist at the Appleseed Quilt Show at the Coliseum in Fort Wayne, Indiana last week. She taught a workshop called Hannah’s Sugar Baskets which I attended. The cost of the class included a kit of fabric. She gave us enough fabric to make the 12 baskets plus extra, triangle paper for 700 HSTs, recipe cards with the patterns, a folder with quilt layout sheets, and her 2011 calendar that includes 3 patterns. The fabric for the class was cut into strips and ready to make half square triangles using the triangle paper.
She had each of us (21 students) sew five sheets of HST (half square triangles), cut them apart and share with the class. We kept 7 HSTs from each sheet and put the rest into 21 piles. When everyone was finished sewing and cutting, we each received one of the piles of HSTs. This created a very nice variety of fabrics and colors that all coordinated.
After lunch we removed the paper from the HSTs and trimmed the ‘dog ears’ from the squares. She then demonstrated how the basket blocks were assembled, giving us hints on color placement. She also gave us tips on choosing fabric patterns. She told us to choose five prints,small, medium, and large size, dots, and stripes. We then assembled blocks until the end of the class.
During the class, Edyta displayed many of her finished quilts, showing them as she taught the class.
I attended this class with two of my very good friends, Cheryl and Kris. During the two hour lunch break, we visited the vendors and viewed some of the quilts displayed in the quilt show.
I returned to the Coliseum the next day to meet another good quilting friend,Sharon. I met her on an online quilting forum a few years ago.
Below are the baskets I made with the HSTs from the class.

- Jul
- 17
“Peekaboo Monkeys” part 2
Posted Saturday, July 17th, 2010 in Fabrics, Family, My Projects, Patterns, Quilting | Read More

The quilt is finished! I bought the book and fabric kit in December and it sat on my sewing table while I worked on lots of other quilts this year. I decided to work on it while on vacation last week. The applique is the reason for the delay. Applique is NOT my favorite thing to do! It went together very quickly and was fun, even doing the applique! I used a straight utility stitch on my Viking Quilt Designer for the embroidery on the faces rather than hand work. It isn’t perfect but as a friend says, “Finished is better than perfect.”


- Jul
- 9
Winter Scene Wall Hanging
Posted Friday, July 9th, 2010 in Fabric Stash, Fabrics, My Projects, Quilting, Wall Hanging | Read More

I first saw this quilt at The Door Mouse in Bettsville, OH when my friend Elsie and I visited the shop in 2008. I purchased the center panel but they did not have all the other fabrics in stock. When I went to The Door Mouse last year (2009) they had them in stock again and I purchased the rest of the fabrics and finished the top. It then went into my pile of unquilted tops.
In June 2010, I put it in the frame and quilted it. The finished size is 50″ X 50″. I plan to hang it on the wall behind my quilt frame during the winter months.
The pattern can be found at
http://www.michaelmillerfabrics.com/MMF/DownLoad.cfm?Gid=1220
It is located near the bottom of the page and is named “Snow Chateau”.
- Jul
- 4
July 2010 Table Runner
Posted Sunday, July 4th, 2010 in Fabrics, My Projects, Patterns, Quilting, table runner | Read More

This is the July table runner from the Calendar Table Runners pattern that I have been using all year. This month I followed the pattern suggestions for all the colors and appliques. I have a piece of fabric for the backing that has red and blue stars on a white background.
- Jun
- 15
June Table Runner
Posted Tuesday, June 15th, 2010 in My Projects, Patterns, table runner | Read More

This month I followed the pattern colors but did not put the applique in the border squares. I plan to use a small satin stitch for the applique. I am looking for small black buttons in the shape of watermelon seeds instead of the suggested appliqued seeds. The runner is diplayed on the small design board that I made this week.
I had strips of red fabric left over from a bento box quilt that I made in Ohio State colors for my daughter. I like the variety of reds in the watermelons.
Update: 6/21/2010
I stitched the appliques with a small satin stitch. The pattern called for small black appliqued seeds on the watermelon. Not wanting to applique the small pieces, I stitched the seeds using stitch number 36 on my Janome 10001.

- Jun
- 14
Smaller design wall
Posted Monday, June 14th, 2010 in My Projects, Quilt Guilds, Quilting, Sewing and Crafting, Tips and Tricks | Read More


I had a tri-fold display board that I had covered with flannel several years ago when I taught a class. All I had to do was add the curtain rods. In the second picture you can see how the curtain rods are attached with the binder clips.
Just click on the picture to enlarge it.

Welcome to Quilting Linda
Within you'll find info about quilting, including my projects soon to be featured below, as well as tidbits about my friends & family. Enjoy!

- Categories
- Accuquilt Go cutter
- Amy Butler
- baby quilt
- Bonnie Hunter mystery quilt
- Celtic Solstice
- Christmas gift
- Decorated Cookies
- Dots on Dots Blog Hop
- Embroidered Quilt Label
- Fabric Stash
- Fabrics
- Family
- Five Little Monkeys
- Gingerbread House
- Grand Illusion
- Heather Bailey
- Hello Moon Block of the Month
- Hello Sun Block of the Month
- jelly roll
- Layer Cake
- Magazines
- Moda charm pack
- Moda City Girl fat quarters
- My Projects
- mystery quilt
- Patterns
- Personal
- Piecemakers Quilt Group
- place mat
- QAL
- Quilt Blocks
- Quilt Classes
- Quilt Guilds
- Quilt Shows
- Quilting
- Quilting tools
- Scrap Quilts
- Sewing and Crafting
- Shop Hop
- table runner
- Tips and Tricks
- Twister quilt
- Twister Wreath
- Wall Hanging
- Websites
-
- By Date
- May 2019
- April 2019
- January 2019
- December 2018
- November 2018
- September 2018
- August 2018
- July 2018
- May 2018
- April 2018
- March 2018
- February 2018
- 2019
- 2018
- 2017
- 2016
- 2015
- 2014
- 2013
- 2012
- 2011
- 2010
- 2009

 © 2009 Linda West
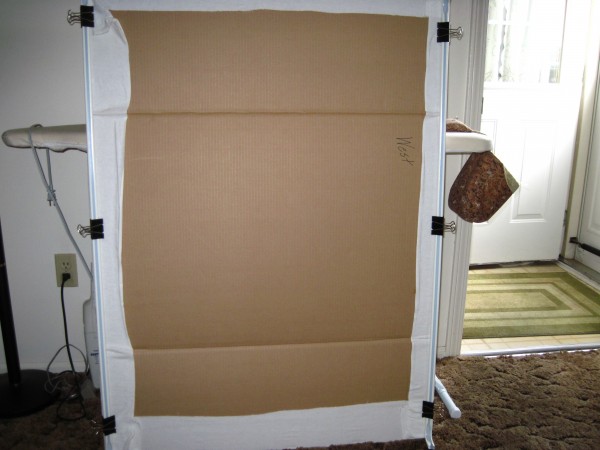