
- Jan
- 7
Christmas 2017
Posted Sunday, January 7th, 2018 in Sewing and Crafting | Read More
This year we had to delay our Christmas party because of the cold weather. Jeff and Christina had frozen water pipes in their house and had to resolve the problems the weekend we had planned to have our party. We had our party this weekend, opening our gifts on Friday evening and spending the day together on Saturday.
We bought a small Janome sewing machine for Sami. It is a very basic, five pound machine with a carrying case. It has different settings for stitch length and runs at a speed slow enough for a child. It forms perfect stitches and is perfect for Sami to learn how to use a sewing machine.
I think I was as excited to give it to her as she was to get it. After all the activity slowed down on Saturday, Sami and I set it up on the card table to try it out. I had some small squares of fabric cut for her to practice on. I asked her what she wanted to make and she said a backpack for her Barbie doll. We made a very primitive bag and put two straps on the top. She was so pleased with her finished product!
I have a small IKEA table and chairs set in my sewing room for her to put her machine on when she is here. She is only four years old and had to stand up to push the foot pedal when we were at the card table. I am hoping she will love sewing as much as I do. She has shown an interest in sewing when I have been working on quilt blocks. She likes to push the scissors button on my machine to cut the thread. She has also shown a huge interest in fabric. I have a container with monkey fabrics that she has claimed.

I am looking forward to spending time sewing with my granddaughter. I plan to move at whatever pace she sets. I want to make it fun for her.


- Mar
- 12
Quilty Fun Sew Along – part 3
Posted Wednesday, March 12th, 2014 in Quilt Blocks, Sewing and Crafting | Read More
The blocks are starting to fit together to complete the Quilty Fun Sew Along quilt. There are three sections in the quilt. I am still making blocks for the center section but the two edge sections are almost complete. The section on the right will have flower blocks on the bottom.

Today I made the 17th set of blocks, the mittens.

Every week we can put pictures of our blocks on a Flicker group, Quilty Fun Sew Along to be eligible for prizes . On Monday, three winners are announced. One of the prizes each week is a package of “Alphabitties”. They are little laminated cards with the letters of the alphabet and ten numbers.. I was lucky enough to win a pack of Alphabitties. I used them for the first time today when I cut out the mitten blocks. I found they were very helpful.. This is how I used them.

These are the rest of the blocks I have made since the last blog post.
Neighborhood Houses

Butterflies

Sewing Spools

- May
- 30
Twister Wreath
Posted Monday, May 30th, 2011 in Fabric Stash, Quilting, Sewing and Crafting, Twister Wreath, Wall Hanging | Read More

This small wall hanging was made from fabric from my stash. I saw a picture of a twister wreath and wanted to try it. (Thank you new2quilting.) It went together very quickly.
I used five inch squares: 9 background, 8 red, and 8 green squares.

The next step is to sew them into rows.

Add 3 inch borders, using the background fabric.

The next step is to cut it apart using the Lil’ Twister tool.

Place the squares into rows in the same order they were cut.

Sew the squares into rows and join the rows together.

The final step is to add a border. I cut two strips 1 1/2 inches wide the width of the fabric. The finished size of the quilt is 20 1/2 inches.
- Jun
- 14
Smaller design wall
Posted Monday, June 14th, 2010 in My Projects, Quilt Guilds, Quilting, Sewing and Crafting, Tips and Tricks | Read More


I had a tri-fold display board that I had covered with flannel several years ago when I taught a class. All I had to do was add the curtain rods. In the second picture you can see how the curtain rods are attached with the binder clips.
Just click on the picture to enlarge it.
- Jun
- 13
My new design wall
Posted Sunday, June 13th, 2010 in Quilt Guilds, Sewing and Crafting, Tips and Tricks | Read More

I made this portable design wall from instructions given at the Appleseed Quilters Guild meeting in April. Items needed are a dressmaker’s cardboard cutting board, two metal curtain rods (72″ white rods that curve at the ends), a piece of flannel or felt 44″ X 80″, 10 large binder clips, and painter’s tape or double sided carpet tape. To make a smaller design wall, a tri-fold display board can be used.
I made mine from items that I had on hand except for the cutting board and curtain rods. I owned a dressmaker’s cutting board but it disappeared long ago. My friend Liz gave me her old cutting board. I purchased the curtain rods at Dollar General for $3.50 each. I had a box of large binder clips, painter’s tape, and a nice piece of white flannel.
Cover the cutting board with the flannel and tape it to the back of the board. Open the curtain rods and fasten to the long sides of the board with the large binder clips. Stand the board against a wall or bookcase to use. I put mine in front of a cabinet in my sewing room.
It went together very quickly. When finished using it, it can be folded up and stored.
My next project will be to make a small board from a tri-fold display board. I already have one covered with felt. All I need to do is to add the curtain rods. It will be a nice size to set up near my sewing machine for smaller projects.
- Feb
- 1
February Table Runner
Posted Monday, February 1st, 2010 in Fabric Stash, Fabrics, My Projects, Quilting, Sewing and Crafting | Read More
I chose pink and tan fat quarters from my stash to make the February table runner. I cut out the squares and appliques on Sunday afternoon and sewed them together on Monday afternoon. The pictures shows it fused but not yet stitched to the background.

- Jan
- 3
My first quilt project for 2010
Posted Sunday, January 3rd, 2010 in Fabrics, Family, My Projects, Patterns, Quilting, Sewing and Crafting | Read More
Jennifer and Tristan gave me a ‘Snippets’ jelly roll and a new quilt book for Christmas. I picked a pattern, Jitterbug, from the book and have started to cut the jelly roll. I bought 3 yards of plain white fabric for the background. I cut the background fabric into 39 strips each 2 1/2 inches.


The cutting of strips and squares is finished!

The HSTs (half square triangles) are sewn and are ready to be sewn into blocks of four HSTs.

The last border was added on February 7. I will use bleached muslin for the backing.
I have had a lot of fun making this quilt. Everything went together perfectly. I did all the pieces at the same time for each step of the quilt.
The only thing I would do differently if I ever use this pattern again, is to trim the excess fabric behind the white sky of the flying geese parts. The pattern said to leave it in for stability but I think it adds too much bulk to the block. I did trim away the excess fabric when I made the sashing pieces and they were stable.
Thank you Jennifer and Tristan! I love my Christmas gift!


Welcome to Quilting Linda
Within you'll find info about quilting, including my projects soon to be featured below, as well as tidbits about my friends & family. Enjoy!

- Categories
- Accuquilt Go cutter
- Amy Butler
- baby quilt
- Bonnie Hunter mystery quilt
- Celtic Solstice
- Christmas gift
- Decorated Cookies
- Dots on Dots Blog Hop
- Embroidered Quilt Label
- Fabric Stash
- Fabrics
- Family
- Five Little Monkeys
- Gingerbread House
- Grand Illusion
- Heather Bailey
- Hello Moon Block of the Month
- Hello Sun Block of the Month
- jelly roll
- Layer Cake
- Magazines
- Moda charm pack
- Moda City Girl fat quarters
- My Projects
- mystery quilt
- Patterns
- Personal
- Piecemakers Quilt Group
- place mat
- QAL
- Quilt Blocks
- Quilt Classes
- Quilt Guilds
- Quilt Shows
- Quilting
- Quilting tools
- Scrap Quilts
- Sewing and Crafting
- Shop Hop
- table runner
- Tips and Tricks
- Twister quilt
- Twister Wreath
- Wall Hanging
- Websites
-
- By Date
- May 2019
- April 2019
- January 2019
- December 2018
- November 2018
- September 2018
- August 2018
- July 2018
- May 2018
- April 2018
- March 2018
- February 2018
- 2019
- 2018
- 2017
- 2016
- 2015
- 2014
- 2013
- 2012
- 2011
- 2010
- 2009

 © 2009 Linda West
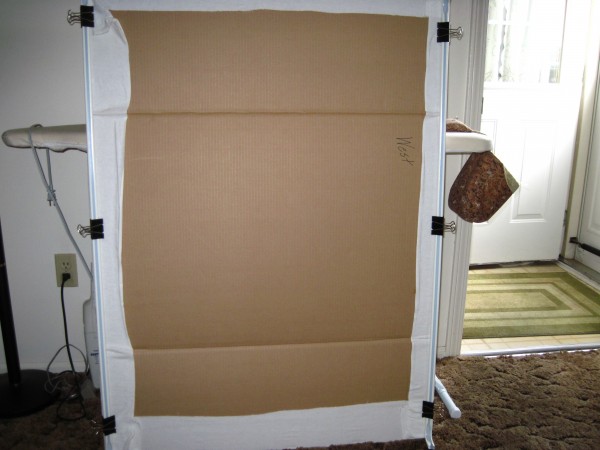