
- Dec
- 5
Mystery Quilt En Provence – Clues 1 and 2
Posted Monday, December 5th, 2016 in Quilting | Read More
I am having so much fun with this quilt! Last week I made all the four patch blocks and this week made the triangle in a square blocks. You can still join the fun at Quiltville! Today you can see all the progress other quilters have made on the mystery quilt here at the link-up party.
Clue 1 took me all week to finish because I was too busy Christmas shopping to do much sewing. I finished pressing them before I started working on clue 2 on Friday. I counted them into groups of ten and clipped them together. I ended up with a few extras of each block. I plan to use them on the back of the quilt. We will see what happens!

Sorry about the picture quality. It is so dark today.


- Nov
- 21
Getting Ready for the Mystery Quilt
Posted Monday, November 21st, 2016 in Quilting | Read More
Bonnie Hunter’s mystery quilt is beginning on Friday, November 25. The fabric requirements have been posted along with the colors she used. As in previous mysteries, she has given paint chip colors for easier fabric selection. She also explains how to use the Ultimate 3-in1 Color Tool. I picked up the paint chips at Lowes and I also have the Color Tool.
I love to make these mystery quilts entirely from my fabric stash if possible. I went through my fat quarters and fabric yardage and found everything I need except for the magenta. I bought 2 magenta pieces, one for the constant in the quilt and the other for the binding.
This year she is introducing a new ruler that she designed. It is not necessary to use this tool. I ordered the Essential Triangle Tool and am excited to try it in this quilt.
These are my fabrics.

- Sep
- 26
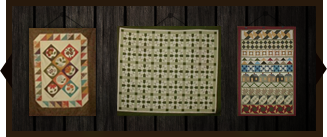
Patchwork Table Runners
Posted Monday, September 26th, 2016 in table runner | Read More
I bought the pattern and a set of yellow strips to make this table runner last fall. Life happened and I didn’t start it until this summer. I have the top finished but not quilted yet. Hopefully it will be quilted soon and I will get to use it this fall. I will add a brown binding which will frame the entire runner.

I used the pattern “Patchwork Sunflower Table Runner Pattern” by Shabby Fabrics.
I used Shabby Fabrics “Patchwork Pumpkins” to make this pumpkin table runner last year.

- Sep
- 25
Be My Neighbor Quilt Along
Posted Sunday, September 25th, 2016 in QAL | Read More
I have always wanted to make a “house” quilt. I am excited to join the Moda Be My Neighbor quilt-along to make a house quilt. There are several online quilt shops that are participating. The shops that I have visited for the patterns are Wool Felt Central and Bear Creek Quilting Company. Beginning on September 6, a new block will be added each Monday through December 19th.
I am printing them out each week. Here is my first block.

I am using fabric from a fat quarter bundle that I received for Christmas last year. I have used some of the bundle for another project so I am hoping that I will have enough to make all 16 blocks. I may have to go shopping if I run out. Wouldn’t that be terrible!
- Sep
- 24
“Mingled” Baby Quilt
Posted Saturday, September 24th, 2016 in baby quilt, Patterns | Read More
My local quilt shop had a “baby shower” sale last weekend. They had sample quilts hanging in the shop that were made from the new patterns/book. The first quilt to catch my attention was the Mingled pattern. It is a very simple quilt but the assembly was intriguing. When the shop owner explained how it went together, I knew I had to make one.
I had some leftover flannel from a kit I bought several years ago that would be perfect for this quilt. As soon as I got home with the pattern, I checked to see if I could use the flannel to make the Mingled quilt. By adding just one more piece of flannel, I had enough to make it.
The quilt is made in three vertical rows with the center row made of Half Square Triangles (HST). The only difficulty I had in making this quilt top was turning the triangles the wrong direction. I put the pieces on my small portable design wall to make sure I had each color in the correct position. This is a very easy quilt to sew.

I have plans to use this pattern again and make some changes to the length of the larger pieces. By changing the size on one side, the points could be off center. To make a larger quilt, more fabrics could be added plus a border. I am not adding a border to this quilt. It is a small quilt, 34″ X 40″.
Stay tuned to see what other projects I have been sewing!
- Aug
- 17
Summer 2016
Posted Wednesday, August 17th, 2016 in Personal | Read More
This has been a busy and hot summer at the West residence. My sewing room is so warm in the afternoon that I have not enjoyed sewing in it, even with the fan blowing in my direction. The ceiling fan seems to make it warmer. I have used my stand-up fans to try to stay cool. We have stayed busy playing with Samantha on Tuesdays and Thursdays and taking her with us to get groceries on Wednesdays. She enjoys bringing home lunch from Wendy’s and eating before we take her home. Another big thrill and the reason she likes to go shopping with us, is to ride the horsie. “Sandy” had been out of commission for several weeks. We had to inspect him every week and tell him to feel better before we could leave the store. Today he was working again, much to the delight of Sami!

I have made a few quilt tops but haven’t quilted them yet. I’m waiting for cooler weather to arrive before loading them on the frame. Lately I have been sewing string blocks using the template paper from Missouri Star Quilt Company to use strips from a Moda scrap bag. I bought both of these items years ago. Most of the projects I have made this summer were from things in my stash. I hope to get them quilted soon and will show them to you then.
- Apr
- 18
Elephants on Parade
Posted Monday, April 18th, 2016 in baby quilt | Read More
We are expecting the birth of our third grandson any day and I haven’t finished his quilt. I have the quilt top done but it needs to be quilted. Before I can quilt it, I have to replace one of the leaders on my quilting frame. That is my goal for today!
Here is a picture of the baby quilt top.

I plan to quilt it with white thread in a large meander pattern.
- Mar
- 8
Zelda: The Quilt-Along — Sashing and Borders
Posted Tuesday, March 8th, 2016 in Quilting | Read More

If you have used interfacing in all of your blocks, you will need to use interfacing on the sashing and borders. The reason you will do this is because the sashing and borders will stretch more than the blocks and it will be difficult to keep it flat to quilt if it does not have interfacing.
Preparing and Cutting the Sashing and Borders
(Sashing = Strips of fabric that go between and around the blocks)
I cut a length of iron-on interfacing to fit the width (selvage to selvage) of the black and the green (Kiwi) fabrics. Press it onto the wrong side of the sashing and border fabrics.
After the interfacing is attached to the back of the fabric, cut 2 1/2 inch strips as follows for the sashing:
Green (Kiwi) = 7 strips
Black =12 strips
Assembling the Quilt Top
You have now assembled all your blocks and they are ready to be joined into sections using sashing strips between the blocks.
For the first section:
1. Sew the Key block to the top of the Candle block.
2. Sew the Fairy block to the top of the Bomb block.
We will join the two sections to the Link block by adding sashing to each long side of the of the Key/Candle block and the Fairy/Bomb block and sewing to the sides of Link.*
Helpful Hint: *Measure the length of the two sections and the Link block. If there is a large difference between the sections, you may need to add a piece to the shorter section. For example: If the Key/Candle block is 1 inch shorter than the Link block, cut a 1.5 inch strip of interfaced black fabric. (The half inch is the seam allowance.) Measure the width of the Key/Candle block (15.5)and cut the 1.5 inch strip that length – 1.5 X 15.5 inches.
Sashing will be added between the blocks in the middle and bottom sections of the quilt, using the same color fabric as the background in the blocks. Sashing will also be added all around the outside of each of the three sections. To do this, measure the length of each section and cut sashing to that measurement for the ends of the section. (It should be the same length as the sashing you added between the blocks.) Next measure the width of the entire section and sew a piece of sashing to the top and bottom of the section. Make sure each of the three large sections measure the same width.
When you have all three sections assembled, sew the sections together as shown above in the illustration of the quilt.
Adding the Border
(3 1/2 inch strips)
Green (Kiwi) = 8 strips
To make the border, I like to join all the strips end to end to make one long piece. Measure the length of the quilt top and cut 2 pieces that length. Sew one on each side of the quilt top. Next, measure the width of the quilt and cut 2 pieces that measurement. Sew to the top and bottom edge of the quilt.
Helpful Hint: If one piece is slightly larger than the other piece, place the larger piece on the bottom next to the feed dogs on the machine when you sew. This helps to ease the slightly different sized pieces together.
Congratulations! You have now finished the quilt top!
Quilt as desired.
I quilted my Zelda quilt on my short-arm quilting frame. Because of the thickness of the quilt top with all the seams and interfacing, I used a large needle in my machine and did a large meander design.
Binding
This is the only part of the quilt that will NOT have interfacing. I like to cut 2.5 inch strips and join them together with a diagonal seam. Use your favorite method of binding to finish your Zelda quilt.
- Mar
- 7
Zelda: The Quilt-Along — Tri-force
Posted Monday, March 7th, 2016 in Quilting | Read More
We are now ready to make Tri-force, the last block in the quilt-along This one is not made with a grid like the rest of the blocks. Because the previous blocks were made with interfacing, we will need to add interfacing to this block also.
You will need a ruler with a 60 degree line.
Before we cut out this block, we will apply iron-on interfacing to the back of the fabric as follows:
Apply interfacing to the wrong side of the Kiwi and the Canary fabrics.
Kiwi
2 pieces – 17 X 9 5/8
1 piece – 8 5/8 X 9 7/8
Canary
3 pieces – 8 5/8 X 9 7/8
We are now ready to cut the large triangles for the right and left sides of the Tri-force blocks using the (2) 17 X 9 5/8 pieces of Kona Kiwi with interfacing. IMPORTANT: These triangles MUST be cut one at a time because they are not the same.
Place your ruler on the diagonal on one piece from the upper left corner to the lower right corner and cut. We will only use one piece. You may discard the other half.
For the second triangle, cut from the upper right corner to the lower left corner. Again, we will use one piece and discard the other piece.
We have now cut the right and left pieces of the Tri-force block.
The center of the block has 1 Kiwi and 3 Canary triangles. Using the 8 5/8 X 9 7/8 interfaced fabrics, mark the center of each piece on one of the 9 7/8 inch sides. Line up the 60 degree line on the ruler with the bottom edge (9 7/8) of the fabric and slide the ruler until it is lining up the bottom corner of the fabric with the center mark on the top edge. Cut on this line. Turn the ruler around and line up and cut the other side to make a triangle. The cut triangle should measure 8 5/8 inches high by 9 7/8 at the base.
See the above picture and assemble the Tri-force block as follows:
Sew the Canary triangles to the right and left sides of the Kiwi triangle. Press seams toward the canary triangle. Sew the 3rd Canary triangle to the third side of the Kiwi triangle and press toward the Canary triangle.
The final step is to sew the large Kiwi triangle to the right and left sides of the Canary and Kiwi triangles that you just assembled. The unfinished* size of the Tri-force block is 18 1/2 X 16 1/2 inches, the same as the Sword and Shield and Bow and Arrow blocks. If your block is smaller than this size, you can add a strip of fabric to the top or bottom of the block to make it longer. and likewise to the sides, to achieve the desired size.
Helpful Hint: * Unfinished size is the measurement before the block is sewn onto the block or sashing next to it.
The final step to assemble the quilt block will be to make sashing and borders. This will be detailed in the next post.

Welcome to Quilting Linda
Within you'll find info about quilting, including my projects soon to be featured below, as well as tidbits about my friends & family. Enjoy!

- Categories
- Accuquilt Go cutter
- Amy Butler
- baby quilt
- Bonnie Hunter mystery quilt
- Celtic Solstice
- Christmas gift
- Decorated Cookies
- Dots on Dots Blog Hop
- Embroidered Quilt Label
- Fabric Stash
- Fabrics
- Family
- Five Little Monkeys
- Gingerbread House
- Grand Illusion
- Heather Bailey
- Hello Moon Block of the Month
- Hello Sun Block of the Month
- jelly roll
- Layer Cake
- Magazines
- Moda charm pack
- Moda City Girl fat quarters
- My Projects
- mystery quilt
- Patterns
- Personal
- Piecemakers Quilt Group
- place mat
- QAL
- Quilt Blocks
- Quilt Classes
- Quilt Guilds
- Quilt Shows
- Quilting
- Quilting tools
- Scrap Quilts
- Sewing and Crafting
- Shop Hop
- table runner
- Tips and Tricks
- Twister quilt
- Twister Wreath
- Wall Hanging
- Websites
-
- By Date
- May 2019
- April 2019
- January 2019
- December 2018
- November 2018
- September 2018
- August 2018
- July 2018
- May 2018
- April 2018
- March 2018
- February 2018
- 2019
- 2018
- 2017
- 2016
- 2015
- 2014
- 2013
- 2012
- 2011
- 2010
- 2009

 © 2009 Linda West